Jetpack Compose 基本环境搭建
在开始用 Jetpack Compose 来编写软件之前,我们需要
Jetpack Compose(简称Compose)是Android新一代UI开发框架,致力于帮助开发者用更少的代码和更直观的API完成Native UI开发。相对于传统的UI开发方式,Compose具有以下几个方面的优势:
- 先进的开发范式:Compose采用声明式的开发范式,开发者只需要聚焦在对UI界面的描述上,当需要渲染的数据发生变化时,框架将自动完成UI刷新。
- 直观易用的API:基于Kotlin DSL打造的API紧贴函数式编程思想,相对于传统的视图开发方式,代码效率更高,实现同样的功能只需要以前一半的代码量。
- 良好的兼容性:Compose代码与基于Android View系统的传统代码可以共存,用户可以按照喜欢的节奏将既有代码逐步过渡到Compose。
- 广泛的适用性:Compose最低兼容到API 21,支持市面上绝大多数手机设备的使用;Jetpack以及各种常用三方库也都第一时间与Compose进行了适配。
1. 一台可以联网的电脑
2. 安装或更新到 最新版的 Android Studio
3. 选择创建 Empty Activity
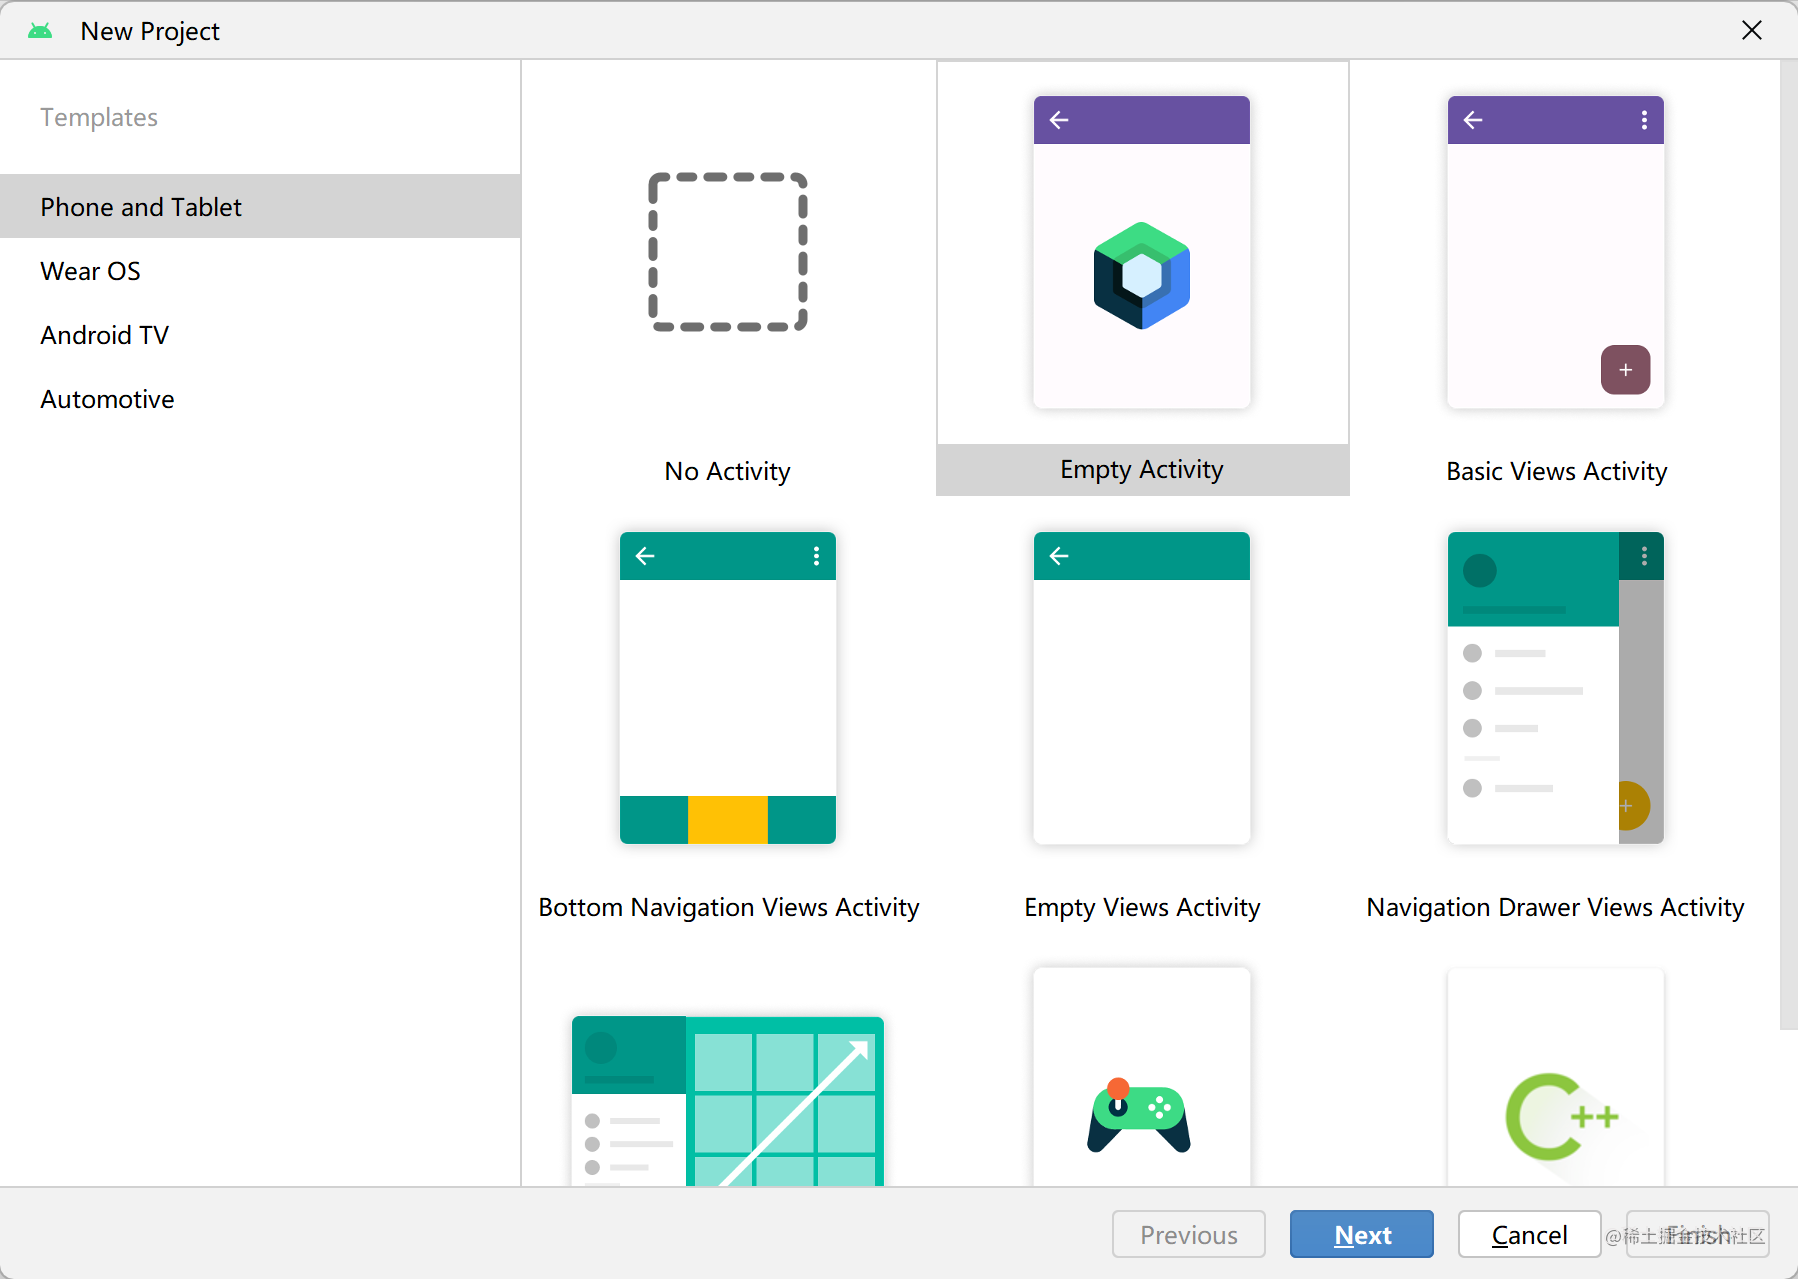
如果你使用的 Android Studio 版本较旧,可能会看见多个 Compose 模板,请选择
Empty Compose Activity (M3)
4. 保持版本更新
尝试使用最新的 Compose 稳定版 和所要求的 Kotlin 版本
Gradle 版本: 7.2
可手动在 gradle-wrapper.properties 中更新,下载很慢,需要多等一下
distributionUrl=https\://services.gradle.org/distributions/gradle-7.2-bin.zip
buildscript {
    ext {
        compose_version = '1.3.1'
        kotlin_version = "1.7.10"
    }
    repositories {
        google()
        mavenCentral()
    }
    dependencies {
        classpath "com.android.tools.build:gradle:7.1.3"
        classpath "org.jetbrains.kotlin:kotlin-gradle-plugin:$kotlin_version"
    }
}
buildscript {

    val compose_version by extra("1.3.1") // Compose 稳定版
    val kotlin_version by extra("1.7.10") // 对应的 Kotlin 版本

    repositories {
        google()
        mavenCentral()
    }
    dependencies {
        classpath("com.android.tools.build:gradle:7.1.3")
        // 注意:Compose 版本有时候需要要求 Kotlin 到达一定的版本,请同步更新
        classpath("org.jetbrains.kotlin:kotlin-gradle-plugin:$kotlin_version")
    }
}
5. 配置 Gradle(可忽略)
您需要将应用的最低 API 级别设置为 21 或更高级别,并在应用的 build.gradle 文件中启用 Jetpack Compose,如下所示。
plugins {
    id 'com.android.application'
    id 'org.jetbrains.kotlin.android'
}

android {
    compileSdk 31

    defaultConfig {
        applicationId "yourAppId"
        minSdk 21
        targetSdk 31
        versionCode 1
        versionName "1.0"

        testInstrumentationRunner "androidx.test.runner.AndroidJUnitRunner"
        vectorDrawables {
            useSupportLibrary true
        }
    }

    buildTypes {
        release {
            minifyEnabled false
            proguardFiles getDefaultProguardFile('proguard-android-optimize.txt'), 'proguard-rules.pro'
        }
    }
    compileOptions {
        sourceCompatibility JavaVersion.VERSION_1_8
        targetCompatibility JavaVersion.VERSION_1_8
    }
    kotlinOptions {
        jvmTarget = '1.8'
    }
    buildFeatures {
        compose true
    }
    composeOptions {
        kotlinCompilerExtensionVersion compose_version
    }
    packagingOptions {
        resources {
            excludes += '/META-INF/{AL2.0,LGPL2.1}'
        }
    }
}

dependencies {
    implementation 'androidx.core:core-ktx:1.6.0'
    implementation "androidx.compose.ui:ui:$compose_version"
    implementation "androidx.compose.material:material:$compose_version"
    implementation "androidx.compose.ui:ui-tooling-preview:$compose_version"
    implementation 'androidx.lifecycle:lifecycle-runtime-ktx:2.3.1'
    implementation 'androidx.activity:activity-compose:1.3.1'
    testImplementation 'junit:junit:4.13.2'
    androidTestImplementation 'androidx.test.ext:junit:1.1.3'
    androidTestImplementation 'androidx.test.espresso:espresso-core:3.4.0'
    androidTestImplementation "androidx.compose.ui:ui-test-junit4:$compose_version"
    debugImplementation "androidx.compose.ui:ui-tooling:$compose_version"
}
需要注意的是,如果你使用的 Jetpack Compose 版本不是稳定版而是最新版的时候,Compose Compiler 版本通常会和 ui, animation 等版本不一致,你需要在应用的 gradle 文件单独设置最新的编译器版本,否则会发生编译错误.
android {
    buildFeatures {
        compose true
    }

    composeOptions {
        kotlinCompilerExtensionVersion = "1.3.0-rc01" // 单独设置 Compose Compiler 版本
    }

    kotlinOptions {
        jvmTarget = "1.8"
    }
}
使用 BOM
自 Jetpack Compose 1.3.0 起,Google 提供了 Compose BOM(Bill of Materials)用于快速指定版本。
BOM 是一个 Maven 模块,它声明一组库和版本的对应关系,将能极大地简化你在 Gradle 依赖块中定义 Compose 库版本的方式。您现在只需要定义一个 BOM 版本,就可以同时指定所有的 Compose 库版本,而不是分别定义每个版本(当库版本开始不同时,这可能会变得很麻烦并且容易出错)。每当 Compose 有一个新的稳定版本时,我们都将发布一个新的 BOM 版本,因此从稳定版本迁移到新的稳定版本将会十分轻松
具体来说,当你在 build.gradle 中引入 BOM 后
// Import the Compose BOM
implementation platform('androidx.compose:compose-bom:2022.11.00')
再引入其它 Compose 相关的库就不需要手动指定版本号了,它们会由 BOM 指定
implementation "androidx.compose.ui:ui"
implementation "androidx.compose.material:material"
implementation "androidx.compose.ui:ui-tooling-preview"
BOM 指定的版本都是稳定版,你也可以选择覆写部分版本到 alpha 版本,如下:
// Override Material Design 3 library version with a pre-release version
implementation 'androidx.compose.material3:material3:1.1.0-alpha01'
需要注意的是,这样可能会使部分其它的 Compose 库也升级为对应的 alpha 版本,以确保兼容性。
BOM 和 库版本 的映射可以在 Quick start | Jetpack Compose | Android Developers 找到,
6. 编写第一个 Compose 程序
现在,如果一切都正常,我们可以看到,MainActivity.kt 上显示以下代码
class MainActivity : ComponentActivity() {
    override fun onCreate(savedInstanceState: Bundle?) {
        super.onCreate(savedInstanceState)
        setContent {
            MyApplicationTheme { // 注意:这里会根据你创建的项目名而不同
                // A surface container using the 'background' color from the theme
                Surface(color = MaterialTheme.colors.background) {
                    Greeting("Android") // ①
                }
            }
        }
    }
}

@Composable
fun Greeting(name: String) {
    Text(text = "Hello $name!")
}

@Preview(showBackground = true)
@Composable
fun DefaultPreview() {
    MyApplicationTheme {
        Greeting("Android")
    }
}
您可以尝试编译运行此项目,以确保各类环境已安装成功。在此基础上,您也可以尝试修改 ①处字符串 "Android" 为其他值,在 debug 模式及较新的 Android Studio 版本下,您将看到修改实时显示到应用程序上——这是 Android Studio 提供的 字面量编辑 支持。您可以之后参阅 官方文档 以了解更多。
现在,我们将 MainActivity.kt 修改成以下:
class MainActivity : ComponentActivity() {
    override fun onCreate(savedInstanceState: Bundle?) {
        super.onCreate(savedInstanceState)
        setContent {

        }
    }
}
7. 目录结构了解
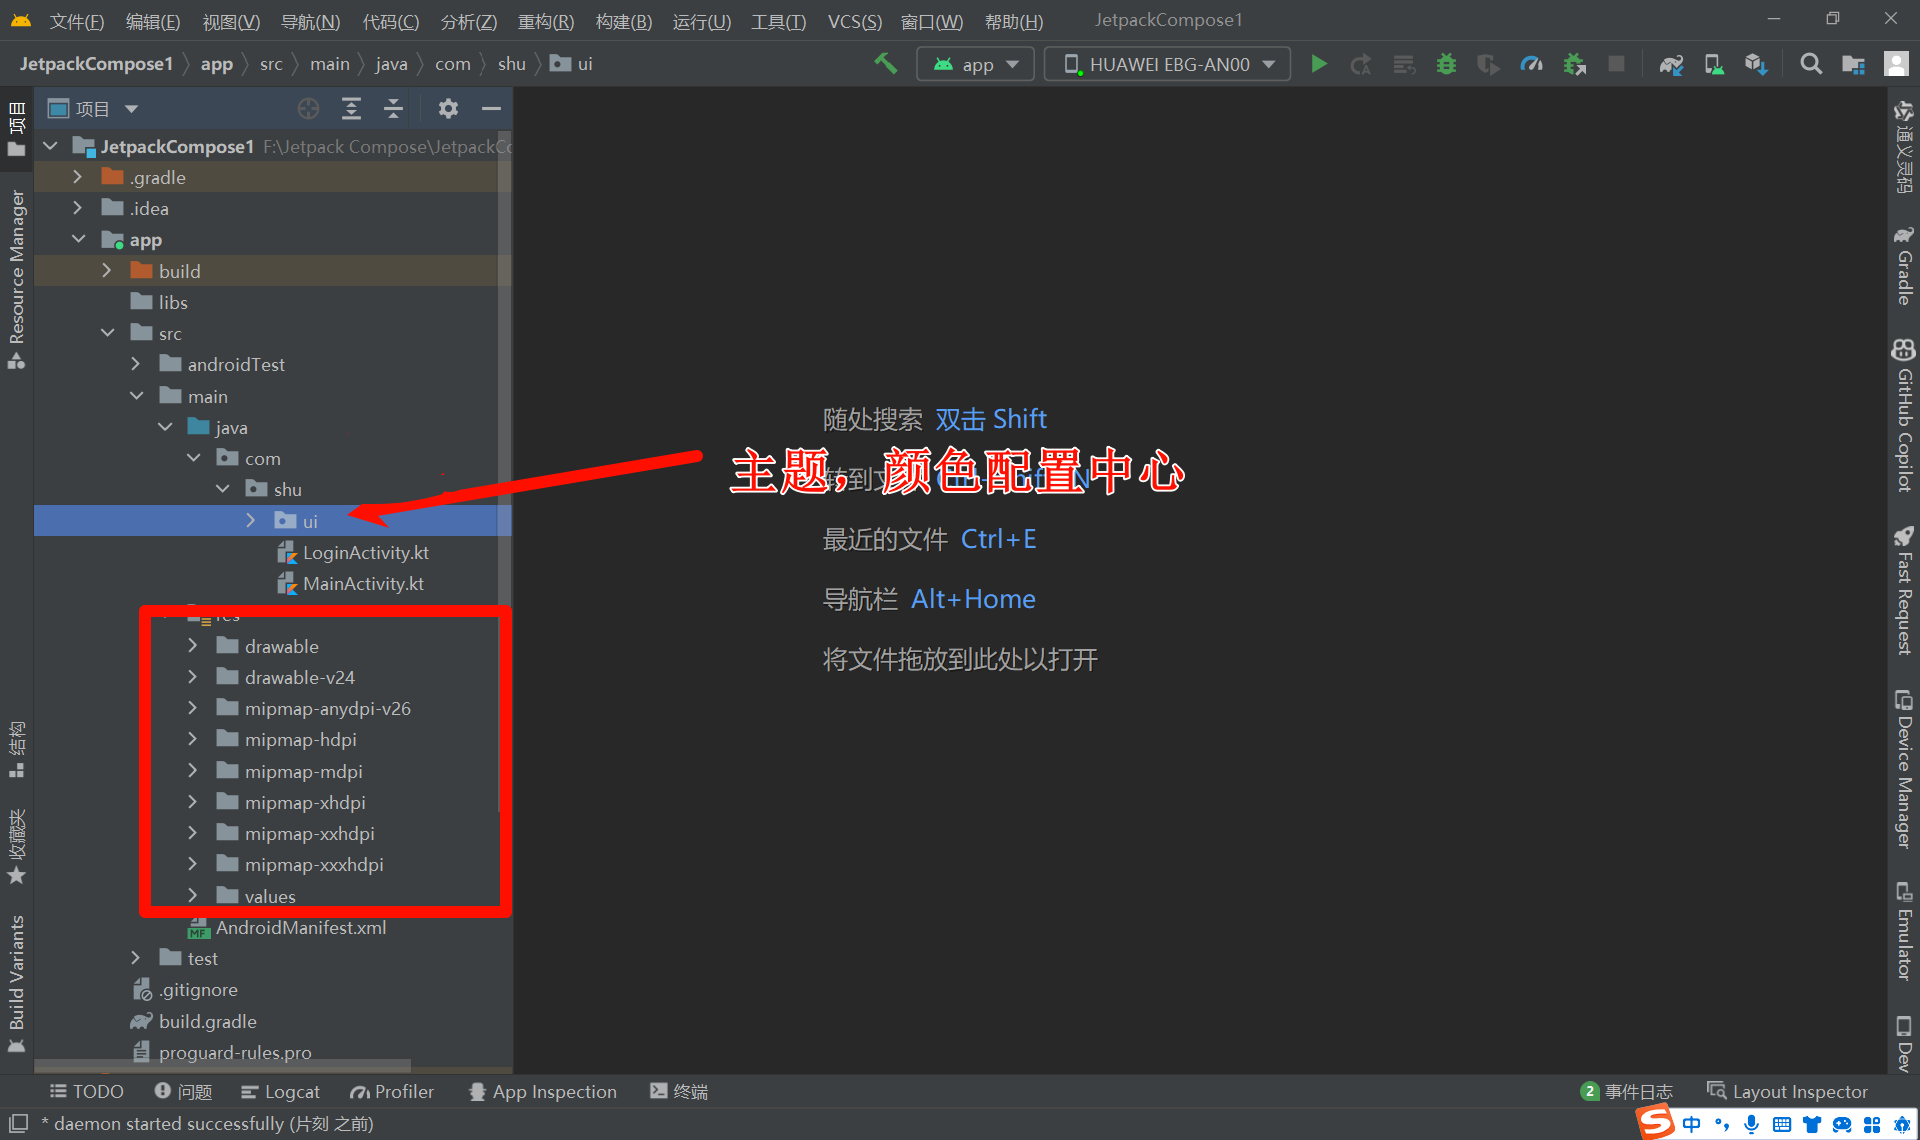
- 对比,java Android项目来说,没有布局文件目录,代替的是声明式布局
- App的主题配置,颜色配置代替的也是编码,保留了文件自由目录
8 一个登录页面案例
- 登录布局,头像,账号,密码,登录
- Row 组件能够将里面的子项按照从左到右的方向水平排列。
- Column 是一个布局组件,它能够将里面的子项按照从上到下的顺序垂直排列。
Jetpack Compose是围绕着Composable函数建立的。这些函数让你通过描述它的形状和数据依赖性,以编程方式定义你的 UI,而不是专注于 UI 的构建过程。要创建一个Composable函数,只需在函数名称中添加@Composable注解。Android Studio可以让你在IDE中预览你的Composable函数,而不需要将应用下载到Android设备或模拟器上。但是有个限制, 需要预览的Composable函数必须不能有任何参数。因为这个限制,你不能直接预览MessageCard()函数。但是,你可以尝试写第一个叫PreviewMessageCard()的函数,它调用带有参数的MessageCard()。在@Composable之前添加@Preview注解。
@Preview(showBackground = true)
@Composable
fun LoginView() {
    //
    JetpackCompose1Theme {
         Column(
            modifier = Modifier
                .fillMaxWidth()
                .fillMaxHeight()
                .drawBehind {
                    drawRect(DarkBlue)
                }
        ) {

            }
        }

    }
- JetpackCompose1Theme: 这个跟你的项目名称有关,简单来说就是主题
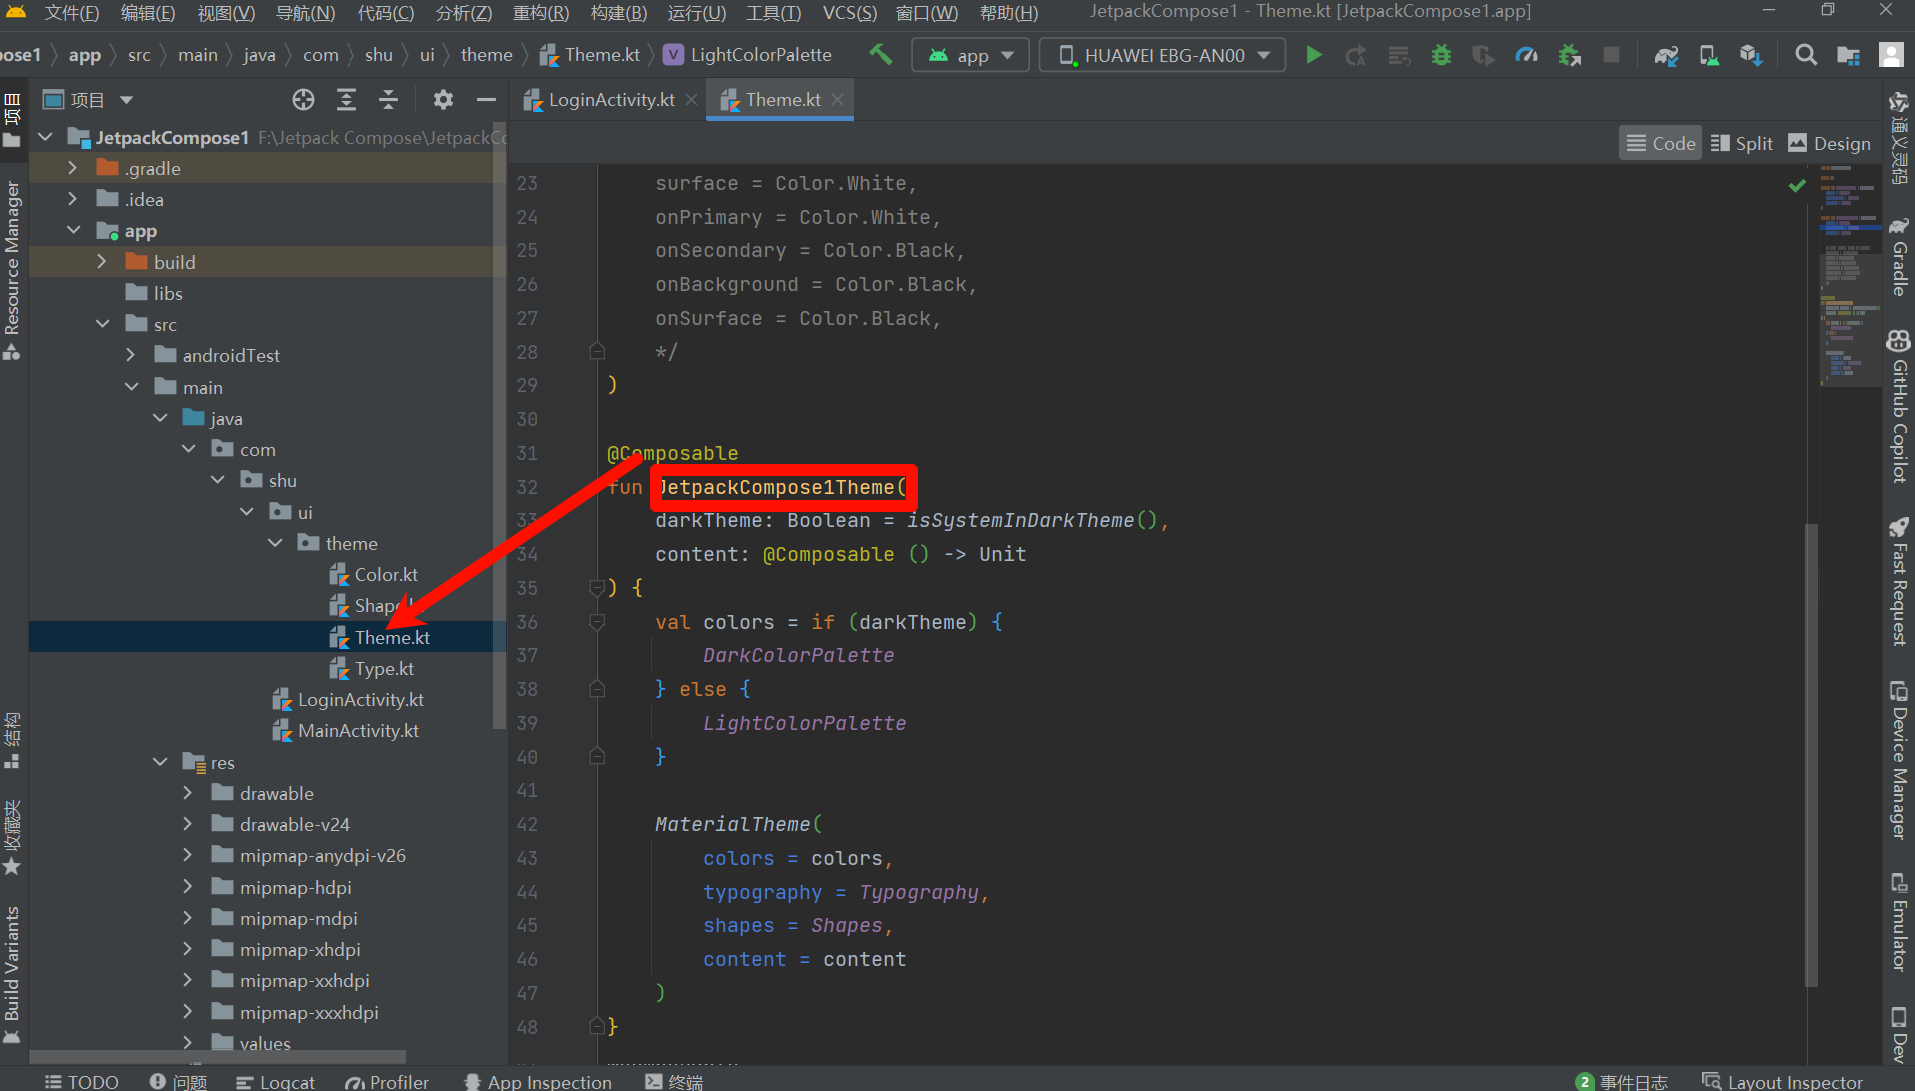
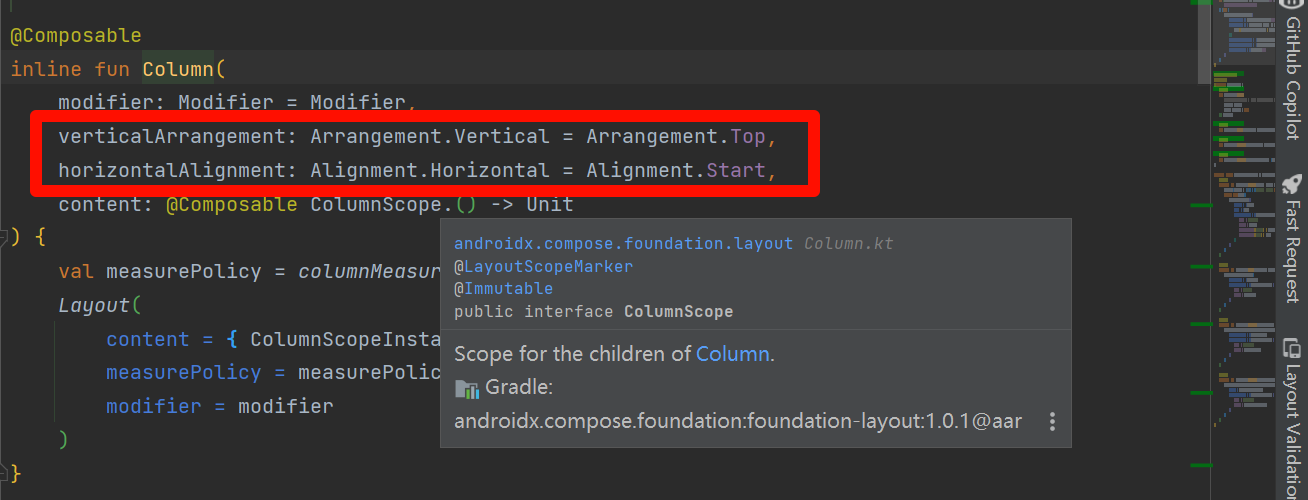
- Column的属性,我感觉只要熟悉Java的熟悉,看下源码们应该都知道,水平方向,垂直方向,Modifier简单理解CSS熟悉,后面会详细介绍,而且组件通用,上面我们首先定义了一个容器填充整个画布,颜色蓝色
- App标题组件:
@Composable
fun AppTitle(title: String) {
    Text(
        text = title,
        color = Color.White,
        modifier = Modifier
            .fillMaxWidth()
            .padding(vertical = 16.dp),
        textAlign = androidx.compose.ui.text.style.TextAlign.Center,
        fontSize = 24.sp
    )
}
- 头像组件
 Image(
          painter = painterResource(id = R.drawable.ic_android_black_24dp),
                    contentDescription = null,
                    modifier = Modifier
                        .size(120.dp)
                        .align(Alignment.CenterHorizontally)
                        .clip(RoundedCornerShape(50))
                        .padding(bottom = 8.dp)
- 用户名,密码 登录
@Composable
fun UserName(username: String, onValueChange: (String) -> Unit) {
    TextField(
        value = username,
        leadingIcon = {
            Image(
                painter = painterResource(id = R.drawable.ic_username),
                contentDescription = null,
                modifier = Modifier
                    .size(24.dp)
            )
        },
        onValueChange = onValueChange,
        label = { Text("用户名") },
        modifier = Modifier
            .fillMaxWidth()
            .padding(vertical = 16.dp)
    )
}

@Composable
fun Password(password: String, onValueChange: (String) -> Unit) {
    TextField(
        value = password,
        leadingIcon = {
            Image(
                painter = painterResource(id = R.drawable.ic_password),
                contentDescription = null,
                modifier = Modifier
                    .size(24.dp)
            )
        },
        onValueChange = onValueChange,
        label = { Text("密码") },

        modifier = Modifier
            .fillMaxWidth()
            .padding(vertical = 16.dp)
    )
}


@Composable
fun LoginButton(onClick: () -> Unit) {
    TextButton(
        onClick = onClick,
        modifier = Modifier
            .fillMaxWidth()
            .padding(vertical = 16.dp)
            .clip(RoundedCornerShape(8.dp))
            .background(DarkBlue)
    ) {
        Text(text = "登录", color = androidx.compose.ui.graphics.Color.White)
    }
}
- 组合
package com.shu


import android.os.Bundle
import android.util.Log
import androidx.activity.ComponentActivity
import androidx.activity.compose.setContent
import androidx.compose.foundation.Image
import androidx.compose.foundation.background
import androidx.compose.foundation.layout.*
import androidx.compose.foundation.shape.RoundedCornerShape
import androidx.compose.material.Text
import androidx.compose.material.TextButton
import androidx.compose.material.TextField
import androidx.compose.runtime.*
import androidx.compose.ui.Alignment
import androidx.compose.ui.Modifier
import androidx.compose.ui.draw.clip
import androidx.compose.ui.draw.drawBehind
import androidx.compose.ui.graphics.Color
import androidx.compose.ui.res.painterResource
import androidx.compose.ui.tooling.preview.Preview
import androidx.compose.ui.unit.dp
import androidx.compose.ui.unit.sp
import com.shu.ui.theme.DarkBlue
import com.shu.ui.theme.JetpackCompose1Theme
import com.shu.ui.theme.LightGreen


class LoginActivity : ComponentActivity() {
    override fun onCreate(savedInstanceState: Bundle?) {
        super.onCreate(savedInstanceState)
        setContent {
            LoginView()
        }
    }
}

@Preview(showBackground = true)
@Composable
fun LoginView() {
    JetpackCompose1Theme {
        var username by remember { mutableStateOf("") }
        var password by remember { mutableStateOf("") }
        Column(
            modifier = Modifier
                .fillMaxWidth()
                .fillMaxHeight()
                .drawBehind {
                    drawRect(DarkBlue)
                }
        ) {
            AppTitle("哈哈哈App")
            Column(
                verticalArrangement = Arrangement.Center,
                modifier = Modifier
                    .fillMaxHeight()
                    .padding(top = 40.dp)
                    .clip(RoundedCornerShape(20.dp))
                    .background(LightGreen)
            ) {
                Image(
                    painter = painterResource(id = R.drawable.ic_android_black_24dp),
                    contentDescription = null,
                    modifier = Modifier
                        .size(120.dp)
                        .align(Alignment.CenterHorizontally)
                        .clip(RoundedCornerShape(50))
                        .padding(bottom = 8.dp)
                )
                Column(
                    modifier = Modifier
                        .fillMaxWidth()
                        .padding(horizontal = 16.dp)
                ) {
                    UserName(username = username, onValueChange = { username = it })
                    Password(password = password, onValueChange = { password = it })
                    LoginButton {
                        Log.d("LoginActivity", "username:$username,password:$password")
                    }
                }
            }
        }
    }
}


@Composable
fun AppTitle(title: String) {
    Text(
        text = title,
        color = Color.White,
        modifier = Modifier
            .fillMaxWidth()
            .padding(vertical = 16.dp),
        textAlign = androidx.compose.ui.text.style.TextAlign.Center,
        fontSize = 24.sp
    )
}


@Composable
fun UserName(username: String, onValueChange: (String) -> Unit) {
    TextField(
        value = username,
        leadingIcon = {
            Image(
                painter = painterResource(id = R.drawable.ic_username),
                contentDescription = null,
                modifier = Modifier
                    .size(24.dp)
            )
        },
        onValueChange = onValueChange,
        label = { Text("用户名") },
        modifier = Modifier
            .fillMaxWidth()
            .padding(vertical = 16.dp)
    )
}

@Composable
fun Password(password: String, onValueChange: (String) -> Unit) {
    TextField(
        value = password,
        leadingIcon = {
            Image(
                painter = painterResource(id = R.drawable.ic_password),
                contentDescription = null,
                modifier = Modifier
                    .size(24.dp)
            )
        },
        onValueChange = onValueChange,
        label = { Text("密码") },

        modifier = Modifier
            .fillMaxWidth()
            .padding(vertical = 16.dp)
    )
}


@Composable
fun LoginButton(onClick: () -> Unit) {
    TextButton(
        onClick = onClick,
        modifier = Modifier
            .fillMaxWidth()
            .padding(vertical = 16.dp)
            .clip(RoundedCornerShape(8.dp))
            .background(DarkBlue)
    ) {
        Text(text = "登录", color = androidx.compose.ui.graphics.Color.White)
    }
}
- 效果
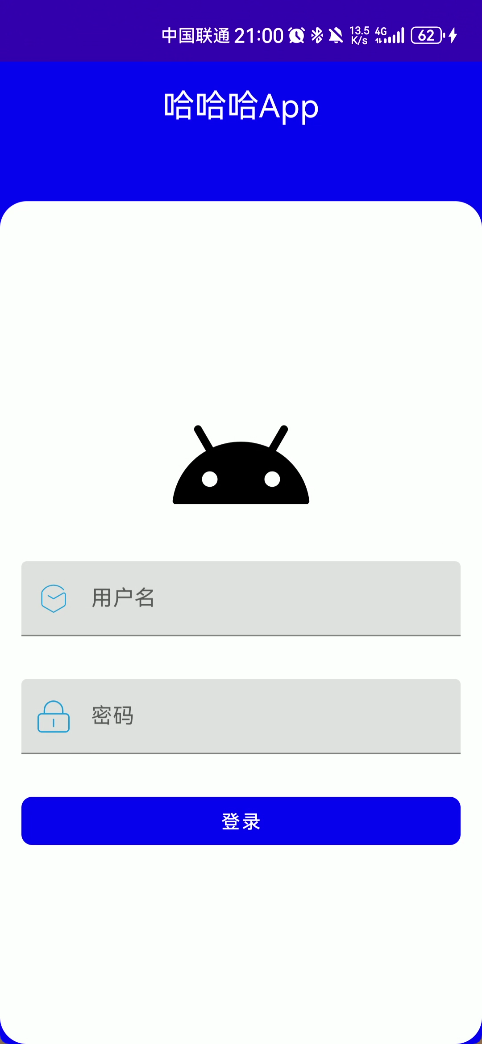
- 总结来说:第一次使用我们可以按照原来的思路进行布局,只是我们需要认识新的属性与样式写法